Medical Foundations 4
Chapter 30GALS Screening MSK Physical Examination
GALS (Gait, Arms, Legs, Spine) Screening Examination:
- Key Idea: The GALS exam is not intended to diagnose a specific problem; rather it is a screening exam to detect if a problem exists. If the GALS screening exam is abnormal – this should be followed by a detailed exam of the affected area.
- The order of the GALS exam is not important – it can vary as it is often more efficient to include components from different sections of the exam together.
- Note on the Pediatric GALS (pGALS) exam: When the GALS exam was tested on patients with Juvenile Idiopathic Arthritis (JIA), it was found to miss significant abnormalities of the foot and ankle, wrists and temporomandibular joints1. Additional focused maneuvers are included to address this concern.
Depending on scenario, a Screening Neurological Exam may be needed as well (Chapter 31 – Screening Neuro Exam)
Part 1: Screening Questions
3 Screening Questions
- Question 1: Do you have any pain or stiffness in your muscles, joint or back?
- Question 2: Can you dress yourself completely without any difficulty?
- Question 3: Can you walk up and down stairs without any difficulty?
Why Ask: These 3 sensitive questions are aimed at identifying common problems of the Musculoskeletal system and significant abnormalities in limb function. Question 1 screens for the common symptoms associated with MSK pathologies. Question 2 screens Upper limb function and is an important daily activity, while Question 3 screens Lower limb function and is an important daily activity.
*Note that in pediatric GALS exam, important to keep developmental context in mind (e.g. Dressing self as a cognitive/adaptive developmental milestone at 5 years old – would not expect a 4-year-old to be able to dress self without difficulty for example)
Part 2: Gait Assessment – Patient Standing
Gait
AFMC level Pre-clerkship 3 · Clerkship 4
Say: I will examine your gait with walking. Could you walk a few steps, then turn and walk back?
Do:
- As patient walks, observe their gait from multiple perspectives (from back, side and front)
- Particularly looking for smoothness of movement (legs, arm swing, pelvic tilt), symmetry, and ability to turn quickly in the absence of back, hip or knee disease.
Report: Patient has a normal gait with no concern for an antalgic or Trendelenburg gait.
Why Check: Gait assessment is included as part of all lower limb assessments (Back, Hip, Knee, Ankle). Normal gait is comprised of the Stance Phase (60% of gait cycle) with initial contact (heel strike) → mid-stance → pre-swing (toe off); and the Swing Phase (40% of gait cycle) with initial swing → mid-swing → terminal swing. An abnormal gait on the GALS exam should prompt an assessment of the lower limbs (and may also require a screening neurological exam).
Specific pathologies to look for include:
- Antalgic Gait: Stance phase shortened on affected side, usually indicating pain on weight-bearing.
- Why: Patient is trying to reduce the time spent weight-bearing on the affected limb.
- Trendelenburg Gait:
- Unilateral: During stance phase, if hip abductors weak on standing side, pelvis will drop to opposite side. The trunk compensates by lurching towards side of weakened abductor muscles.
- Bilateral: Produces a Waddling Gait.
- Why: Leaning on the affected side to align the centre of gravity allows for minimizing torque.
Heel-walking and Toe-walking (Pediatrics)
Say:
- I will continue to examine your gait. Can you walk on both heels for a few steps, then turn and walk back?
- I will continue to examine your gait. Can you walk on both tiptoes for a few steps, then turn and walk back?
Do:
- As patient walks on tiptoes, observe foot posture including arches. Observe for antalgic gait for heel- and toe-walking as well. As above, observe gait from multiple perspectives (from back, side and front), looking for smoothness of movement, symmetry and ability to turn quickly.
Report: Patient has a normal gait with normal heel and toe-walking with no concerns for antalgic gait.
Why Check: These tests are part of the pGALS exam. An inability to walk on heels or on tiptoes is a good screening maneuver for the ankle and foot (commonly involved in Juvenile Idiopathic Arthritis). Antalgic gait specifically with heel or toe-walking may indicate localized causes of pain (e.g. Sever’s disease, enthesitis of the ankle with heel-walking; Morton’s Neuroma with tiptoe walking). Note that habitual toe walking is common and normal in young children up to 3 years old.
Part 3: Spine PLUS Assessment (includes elements of Leg Assessment to simplify exam flow) – Patient Standing
Inspect from behind patient, from the side of patient, and from the front of patient (Spine, muscles, lower limbs)
AFMC level Pre-clerkship 3 · Clerkship 4
Say: I will inspect the muscles and bones first standing to the back and rotating around the side to the front. Please stand with both arms relaxed at the sides.
Do:
- Standing behind the patient, inspect muscle bulk and symmetry (e.g. of shoulders, paraspinal muscles, gluteal muscles, hamstrings, calves). Look at alignment of spine (e.g. spine itself, shoulder height, level of scapula angles, asymmetric skin folds). Look for equal level of iliac crests; valgus/varus knee deformities; popliteal fossae for swelling; and hind foot for deformities or swelling.
- Moving to face the patient’s side, inspect spine alignment, limb alignment (elbow extension, knee extension).
- Moving to face the patient’s front, inspect muscle bulk and symmetry (e.g. of shoulders, pectoralis, quadriceps). Inspect the patient’s feet for deformities (e.g. high arches, flat feet, hallux valgus).
Do: I note normal muscle bulk, symmetry and alignment throughout the patient’s spine, upper and lower limb.
Why Check:
- Back: ↑ thoracic kyphosis may indicate ankylosing spondylitis or vertebral fractures (e.g. osteoporosis); ↑ lumbar lordosis may indicate a hip flexion contracture; ↓ lumbar lordosis may indicate ankylosing spondylitis. Scoliosis may be detected particularly looking at symmetry, shoulder height and skin folds.
- Knees: Varus and Valgus Knee deformities can be an important cause of knee pain, while a swollen popliteal fossa may indicate a Baker’s Cyst or Knee effusion.
- Looking at the Ankle and Foot, standing behind the patient may elicit a “Too Many Toes” Sign (>2 toes visible – suggesting severe pes planus or posterior tibialis dysfunction). Inspection may also reveal abnormal arches e.g. splaying of toes (collapse of transverse arch), pes planus (flat feet – collapse of longitudinal arch), or pes cavus (high longitudinal arch)
A positive test should prompt a full assessment in the areas of concern identified, e.g. if concern for Scoliosis identified, should conduct a full assessment of the back (Chapter 29 – Back Exam).
Active ROM: Lateral Flexion of Neck
AFMC level Pre-clerkship 3 · Clerkship 4
Say: I will now assess range of motion in the neck. Could you please tilt the head to each side, to bring the ear towards the shoulder? Please let me know if you feel any pain, and if so, where.
Do: Watch the patient’s active range of motion and monitor for signs of pain. Monitor if patient is elevating their shoulders to touch the ear to the shoulder (e.g. to minimize movement of their neck)
Report: The patient is able to touch their ear to their shoulder, with 30 degrees lateral flexion, which is normal.
Why Check: This movement assesses cervical spine lateral flexion (often first movement affected in cervical spine disorders). A positive test should prompt a full assessment of the back (Chapter 29 – Back Exam).
Active ROM: Lumbar Spine Movement
AFMC level Pre-clerkship 3 · Clerkship 4
Say: Can you bend forward to touch the toes? Please let me know if you feel any pain, and if so, where.
Do: Assess at patient’s side for spine movement through this range of motion. Look at the lumbar spine for transition from lumbar lordosis to kyphosis. This can also be done by placing 2 fingers on the lumbar spine during the motion, where your fingers should move apart on flexion, and come back together on extension.
Report: The patient has a normal range of motion throughout their spine, able to touch their toes without pain, with normal lumbar spine transition to kyphosis when bending forward.
Why Check: This movement assesses flexion and extension of the thoracolumbar spine. It is an important activity of daily living. A positive test should prompt a full assessment of the back (Chapter 29 – Back Exam).
Assess Temporo-mandibular joint ROM (Pediatrics)
AFMC level Pre-clerkship 3 · Clerkship 4
Say: Can you open the mouth and place your own 3 fingers in the mouth vertically? (clinician may model)
Do: Ask patient to open mouth and insert their own 3 fingers in mouth vertically (e.g. D2 finger touching top incisors, D4 finger touching bottom incisors). Assess Temporomandibular joint range of motion. Look for deviation of the jaw and micrognathia. Listen for clicks.
Report: The patient has a normal temporomandibular joint range of motion and is able to put their own 3 fingers in their mouth.
Why Check: This maneuver screens for temporomandibular joint (TMJ) range of motion, deviation of jaw movement, and micrognathia. These are common sites of involvement in Juvenile Idiopathic Arthritis.
Part 4: Arms Assessment – Patient may be Standing or Sitting
Active ROM: Hands behind head
AFMC level Pre-clerkship 3 · Clerkship 4
Say: I will now assess arm range of motion. Could you place both hands behind the head with elbows back?
Do: Watch patient’s active range of motion and monitor for signs of pain.
Report: The patient is able to put their hands behind their head without limitation.
Why Check: This movement sequence assesses shoulder abduction (often first movement affected in rotator cuff disorders), and external rotation (often first movement affected in glenohumeral problems). It also assesses elbow flexion, sternoclavicular (SC) and acromioclavicular (AC) joint movement. This is a functionally important movement (e.g. for eating, washing, grooming). A positive test should prompt a full assessment of the upper limb, with attention paid to areas of decreased ROM or pain. For example, if shoulder abduction is limited with pain in shoulder, this should prompt a full assessment of the shoulder (Chapter 23 – Shoulder Exam).
Active ROM: Back of hands and wrists
AFMC level Pre-clerkship 3 · Clerkship 4
Say: Now, please bring the elbows down to their sides (elbow extension) with palms up. Then, turn both hands over with palms down and fingers outstretched.
Do: Watch patient’s active range of motion and monitor for signs of pain.
Report: The patent is able to lower their arms, pronate and supinate their hands without limitation.
Why Check: This movement sequence assesses elbow extension (often first movement affected in elbow problems), supination and pronation with composite elbow, radioulnar and wrist movements. A positive test should prompt a full assessment of the upper limb, with attention paid to areas of decreased ROM or pain. For example, if elbow extension was limited with pain at elbow, this should prompt a full assessment of the elbow (Chapter 24 – Elbow Exam).
Observe Dorsum of Hands and Wrists
AFMC level Pre-clerkship 3 · Clerkship 4
Say: Please continue to hold the hands out with palms down and with fingers outstretched.
Do: Inspect the wrists, hands and fingers for swelling and deformity, and skin and nail changes.
Report: The patient’s wrists, hands and fingers are normal on inspection with no signs of swelling, erythema, atrophy, deformity or skin changes.
Why Check: As detailed in Chapter 25 – Hand and Wrist Exam, inspection can provide diverse diagnostic info:
- Swelling suggests inflammation (e.g. inflammatory arthritis, tenosynovitis, etc.); patterns of joint swelling can provide clues (e.g. DIPs spared in Rheumatoid Arthritis, vs. can be affected in Psoriatic Arthritis)
- Deformities can suggest Inflammatory arthritis (e.g. radial deviation of wrist, ulnar deviation of fingers, etc.) or Osteoarthritis (e.g. squaring of wrist, Bouchard’s and Heberden’s Nodes)
- Skin and Nail Changes can suggest Psoriatic arthritis (e.g. dactylitis, onycholysis, nail fold hemorrhages), Vasculitis (e.g. splinter hemorrhages, peri-ungal infarcts), or Gout (e.g. gouty tophi of hands)
A positive test should prompt full assessment of hand and wrist (Chapter 25 – Hand and Wrist Exam).
Squeeze MCP Joints
Say: I will now assess the MCP joints in the hands. Please let me know if you feel any pain, and if so, where.
Do: Gently grasp across MCPs with one hand and squeeze. Ask patient if this is painful.
Report: MCP squeeze test is negative.
Why Check: The MCP squeeze test producing pain suggests inflammatory arthritis. A positive test should prompt full assessment of hand and wrist (Chapter 25 – Hand and Wrist Exam).
Observe Palms of Wrists and Hands
AFMC level Pre-clerkship 3 · Clerkship 4
Say: Please turn both hands over and hold them out with palms up and with fingers outstretched.
Do: Inspect the palms for muscle atrophy, tendon thickening, and other changes.
Report: The patient’s palms are normal on inspection with no signs of swelling, erythema, atrophy, deformity or skin changes.
Why Check: As detailed in Chapter 25 – Hand and Wrist Exam, inspection can provide diverse diagnostic info:
- Palmar erythema can suggest diverse systemic conditions (e.g. portal hypertension, chronic liver disease, rheumatoid arthritis, pregnancy, thyrotoxicosis, etc.).
- Atrophy can suggest important nerve injuries (e.g. thenar wasting in median nerve injury from Carpal Tunnel Syndrome, hypothenar wasting and interossei muscle wasting in ulnar nerve injury, etc.).
- Dupuytren’s Contractures can be idiopathic but also suggest diverse systemic conditions (e.g. diabetes, alcohol use, liver disease, liver cirrhosis).
A positive test should prompt full assessment of hand and wrist (Chapter 25 – Hand and Wrist Exam).
Assess Hand ROM
AFMC level Pre-clerkship 3 · Clerkship 4
Say: With the palms still up and fingers outstretched, please make a fist and then extend all the fingers.
Do: Observe patient’s active range of motion and monitor for signs of pain.
Report: The patient has a normal grip function and range of motion with their fingers.
Why Check: This test assesses active ROM across MCPs, PIPs and DIPs, important for daily activities. A positive test should prompt full assessment of hand and wrist (Chapter 25 – Hand and Wrist Exam).
Assess Fine Precision Pinch
AFMC level Pre-clerkship 3 · Clerkship 4
Say: With the palms still up and fingers outstretched, please touch each finger to the thumb, one at a time.
Do: Observe patient’s fine precision pinch, active range of motion and monitor for signs of pain.
Report: The patient has normal opposition and range of motion in their hands with no signs of pain.
Why Check: Opposition (touching thumb to each finger) tests the joints of the hand, coordination and concentration. It is also important for daily activities e.g. dressing. A positive test should prompt full assessment of hand and wrist (Chapter 25 – Hand and Wrist Exam).
Assess Grip Strength
AFMC level Pre-clerkship 3 · Clerkship 4
Say: With the palms still up and fingers outstretched, please squeeze my fingers
Do: Place your 4 fingers in each hand of the patient. Ask the patient to squeeze your fingers. Assess strength.
Report: The patient’s grip strength is normal.
Why Check: Grip strength assesses power across the MCPs, PIPs and DIPs. This is important for daily activities. A positive test should prompt full assessment of hand and wrist (Chapter 25 – Hand and Wrist Exam).
Assess Wrist Extension and Flexion (Pediatric)
AFMC level Pre-clerkship 3 · Clerkship 4
Say: Please place the hands together palm-to-palm (Prayer sign – clinician may model). Now, please place the hands together back-to-back (clinician may model).
Do: Assess finger joint extension; wrist extension and flexion; elbow flexion; and coordination of finger joints.
Report: The patient has normal wrist flexion and extension with normal coordination and no deformities seen.
Why Check: These tests are part of the pGALS exam. They can assess for hypermobility with wrist extension and flexion, extension of small joints of fingers, and elbow flexion. They may also reveal Swan Neck Deformities (PIP hyperextension, DIP flexion) and Boutonniere’s Deformities (PIP flexion, DIP hyperextension),
Assess Shoulder Abduction, Wrist/Elbow Extension, Neck Extension (Peds)
AFMC level Pre-clerkship 3 · Clerkship 4
Say: Please reach up and touch the sky. Now, tilt the head back to look upwards at the ceiling.
Do: Assess neck extension; shoulder abduction; elbow extension; and wrist extension. Look for asymmetry and reduced range of motion.
Report: The patient has normal neck extension, shoulder abduction, elbow extension and wrist extension, with no signs of asymmetry on exam.
Why Check: These tests are part of the pGALS exam. They can assess for hypermobility. Asymmetry on exam (e.g. reduced shoulder abduction on the left) would be important to investigate further as a potential sign of pathology.
Part 5: Legs Assessment – Patient Supine
Passive ROM – Knee Flexion and Hip Flexion
AFMC level Pre-clerkship 3 · Clerkship 4
Say: I will examine the hips and knees for range of motion. Let me know if you feel any pain, and if so, where.
Do: Clinician places one hand on the knee to feel for crepitus, while stabilizing the lower leg with other hand. Passively flex the knee and the hip. Assess for Bony End-Feel vs. Soft End-Feel, observe the passive range of motion you can elicit, and monitor for signs of pain.
Report: The patient has a Hip Flexion of about 120 degrees and Knee Flexion of 135 degrees which is normal, with normal end-feel and no pain.
Why Check: If patient passive ROM is limited, it is reasonable to expect limited active ROM. Knee flexion and hip flexion are important for daily activities e.g. walking. Normal knee flexion is 135 degrees. Normal hip flexion is 120 degrees. A positive test should prompt a full assessment of the lower limb, with attention paid to areas of decreased ROM or pain. For example, if knee flexion is limited with bony-end feel, this should prompt a full assessment of the knee (Chapter 26 – Knee Exam).
Passive ROM – Hip Internal Rotation
AFMC level Pre-clerkship 3 · Clerkship 4
Say: I will continue to examine the hips for range of motion. Let me know if you feel any pain, and if so, where.
Do: Continuing to assess passive range of motion with one hand on the knee, and stabilize lower leg with other hand. Bring hip and knee to 90 degrees of flexion. Bring the foot outwards with femur as axis of rotation to internally rotate hip. Assess for Bony End-Feel vs. Soft End-Feel, observe the passive range of motion you can elicit, and monitor for signs of pain.
Report: The patient has a normal Hip Internal Rotation of about 40 degrees, with normal end-feel and no pain.
Why Check: If patient passive ROM is limited, it is reasonable to expect limited active ROM. Normal hip internal rotation is 35-40 degrees and is usually the first movement affected by hip problems. A positive test should prompt full assessment of the hip (Chapter 27 – Hip Exam)
Palpate Knee Temperature
AFMC level Pre-clerkship 3 · Clerkship 4
Say: I will palpate each knee for temperature.
Do: Palpate above and below knee with the back of your hand. Then palpate the knee itself.
Report: The knee is cooler than above and below the joint, which is normal.
Why Check: Knee joint temperature should be cooler than above and below. Warmth may be a sign of Inflammatory Arthritis, Septic Arthritis, etc. A positive test should prompt full assessment of the knee (Chapter 26 – Knee Exam)
Assess for Knee Effusion
AFMC level Pre-clerkship 3 · Clerkship 4
Say: I will palpate each knee for swelling.
Do:
- Fluid Wave Test or Bulge Sign: Sweep your hand up the medial aspect of the knee to empty the medial fossa. Then sweep down the lateral aspect, looking for a bulge forming in the medial fossa.
- Patella Tap: Apply pressure with one hand just above the patella and sweep down until you reach the upper pole of the patella. This pushes fluid into the suprapatellar pouch behind the patella. Keep pressure applied. With other hand, use 1-2 fingers to push the patella down, and assess whether it taps the femur and bounces back up.
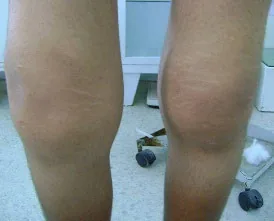
Bilateral Knee Effusion2
Report: There is no knee effusion palpated with fluid wave or patella tap.
Why Check: The Fluid Wave Test/Bulge Sign is useful for smaller knee effusions (may be false negative in larger effusion), whereas the Patella Tap is useful for moderate-large knee effusions (may be false negative in smaller effusion). A positive test should prompt full assessment of the knee (Chapter 26 – Knee Exam)
Inspect Ankles and Feet
AFMC level Pre-clerkship 3 · Clerkship 4
Say: I will inspect the ankles and feet for swelling or deformities.
Do: Inspect the ankles and feet for swelling or deformities.
Report: I note no swelling or deformities of the patient’s ankles and feet.
Do: Inspecting for deformities can reveal common problems like Hallux Valgus (subluxation of 1st MTP, commonly accompanied by Bunion = bony prominence on medial side of 1st MTP), Hammer Toes (irreversible flexion of PIPs), Claw Toes (irreversible flexion of PIPs and DIPs), or Mallet Toes (irreversible flexion of DIPs). When inspecting for swelling, the location of swelling can provide important clues, for example:
- Loss of normal depressions anterior to malleoli → Suggests True Ankle Swelling
- Swelling posterior to lateral malleolus → Suggests Peroneal Tenosynovitis
- Swelling posterior to medial malleolus → Suggests Posterior Tibial Tenosynovitis
- Swelling at back of heel → Suggests Retrocalcaneal Bursitis or Retroachilleal Bursitis
- Swelling of the forefoot → Can be seen in Inflammatory Arthritis
Positive findings on inspection should prompt full assessment of ankle and foot (Ch 28 – Ankle/Foot Exam)
Squeeze MTP Joints
Say: I will now assess the MTP joints in each foot. Please let me know if you feel any pain, and if so, where.
Do: Gently grasp across MTPs with one hand and squeeze and ask patient if this is painful.
Report: MTP squeeze test is negative.
Why Check: The MTP squeeze test producing pain suggests inflammatory arthritis. A positive test should prompt full assessment of ankle and foot (Chapter 28 – Ankle/Foot Exam)
Inspect Soles for Calluses
AFMC level Pre-clerkship 3 · Clerkship 4
Say: I will now inspect the soles of each foot for calluses.
Do: Inspect for calluses (rough, thickened area of skin).
Report: I note no calluses on the patient’s feet.
Why Check: Calluses may indicate pressures from an abnormal gait or stance. Positive findings on inspection should prompt full assessment of ankle and foot (Chapter 28 – Ankle/Foot Exam)
Helpful Video to Review:
- Video 1: GALS Adult Exam – Canadian Rheumatology Association (Link: https://www.youtube.com/watch?v=asUVyjiZYbg)
- Video 2: GALS Pediatric Exam – Canadian Rheumatology Association (Link: https://www.youtube.com/watch?v=MNBfsrX_9Lc)
GALS Exam – Recording Findings:
If GALS exam is unremarkable, you can record “GALS: NAD” (NAD = No Abnormalities Detected) as part of your general physical exam. If abnormalities are detected, a systematic way of recording this is as follows:
| Screening Questions | Responses |
|---|---|
| Any pain in joints, muscles or back? | Pain in both wrists |
| Problems with dressing? | None |
| Problems with walking up/downstairs? | None |
| Examination | Appearance | Movement |
|---|---|---|
| Gait | N/A | √ |
| Arms | X | √ |
| Legs | √ | √ |
| Spine | √ | √ |
| Details | Swelling of both hands and wrists – query early Rheumatoid Arthritis? |
*Note: Pediatric GALS Exam is recorded using the same format.
References
-
Foster HE, Jandial S. pGALS – pediatric Gait Arms Legs and Spine: a simple examination of the musculoskeletal system. Pediatr Rheumatol Online J. 2013;11:44. ↩
-
Akrout R, et al. Hypertrophy of the feet and ankles presenting in primary hypertrophic osteoarthropathy or pachydermoperiostosis: a case report. J Med Case Rep. 2012;6:31. ↩